
Servicenow Procedure – MID Install
Critical to the design is the installation of the MID Server in your developer instance. Typically this is installed via the installer on the site, but requires a few extra steps when installing on, say, your PC. First what you will want to do is navigate to MID Server >> Downloads. On the Downloads screen, check the “Download MID Server as ZIP archive” which will present the Linux and Windows option. Click the download button (highlighted below) and save the zip to the file location where the MID Server will be installed from.
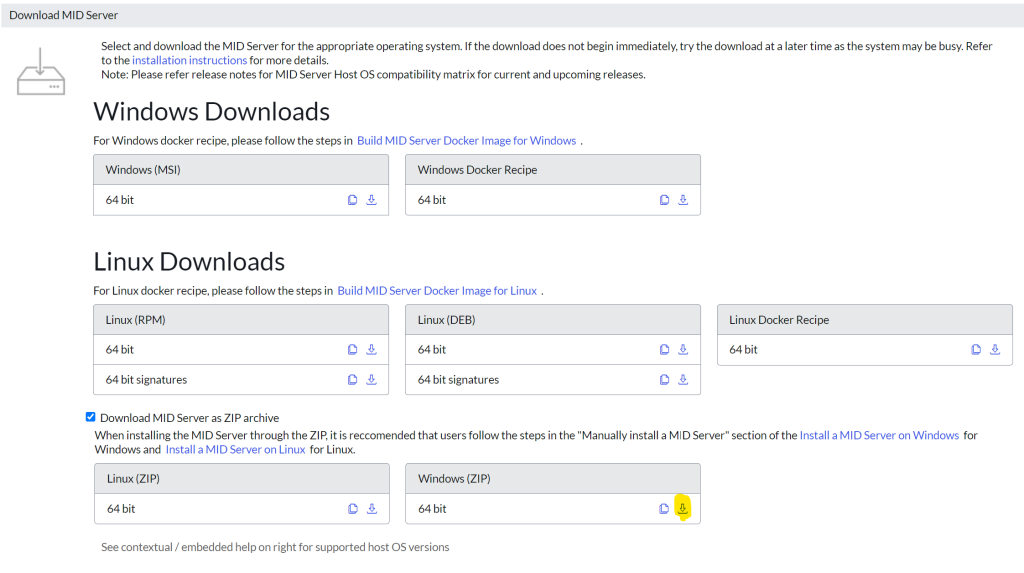
For this example, I’ll be loading the zip to D:\Servicenow and will be downloading the file “mid.vancouver-07-06-2023__patch2-hotfix1-10-04-2023_10-06-2023_1235.windows.x86-64.zip” to this location. At the root of the D:\Servicenow directory, create a file folder giving it the name of the MID Server as the folder name.
Best Practice: When creating a name for the MID Server, its imperative that the name reflects the purpose, location, instance, and a unique attribute. The convention typically used is:
[location]-[instance][type]-[unique attribute]
This will provide enough information on first glance to determine where and how the MID server is used on the server. For example, I will be installing a development operations MID server for system number 1 on my personal laptop (name JHD). The name would be formatted as: JHD-DevOps-0001. All of this pretty much follows the standard, but what should the unique attribute be and why did I use 0001? In a nutshell, the powershell infrastructure for each Windows machine will be assigned a unique 4 digit number. This can be the last octet of the IP address, a number specified in the name, or just a random number created that has been assigned to the machine. Since my developer MID server is the first, I’ll assign it to “0001” (always left fill your number with zeros so that the automations that use the number can always expect it to be 4 digits).
For our example, as defined in the best practice, I’ll create the directory D:\Servicenow\JHD-DevOps-0001 for this MID.
Open up the zip file “mid.vancouver-07-06-2023__patch2-hotfix1-10-04-2023_10-06-2023_1235.windows.x86-64.zip” and there will be two directories, “agent” and “META-INF”. Copy the “agent” directory to “D:\Servicenow\JHD-DevOps-0001”. Navigate in to the agent directory and edit the config.xml file as follows…
- change YOUR_INSTANCE.service-now.com to [instance].service-now.com. For example:
<parameter name=”url” value=”https://dev192598.service-now.com/”/>
- change YOUR_MIDSERVER_NAME_GOES_HERE to the name of the mid server (i.e., JHD_DevOps_0001). For Example:
<parameter name=”name” value=”JHD_DevOps_0001″/>
- change the username and password to be the local mid server password. For example:
<parameter name=”mid.instance.username” value=”MID_Dev”/>
<parameter name=”mid.instance.password” secure=”true” value=”INSERT-PWD-IN-CLEAR-TEXT”/>
Best Practice: When creating a local name to use on the MID server, you basically have two options – create a generic name for all of the mid servers for a “MID Server type”, or create a unique id for each MID Server. Generally for subprod MID servers a generic name will be used for all on an instance, such as MID_Disco (for discovery MID Servers) or MID_Int (for integration MID Servers). On production MID Servers its best to use unique local id’s such as MID_JHD_DEVINT_0001 or MID_JHD_DEVDISCO_0001, but always keep the identifier MID_ in the beginning of the id so it can be easily sorted out of a list. The choice you make, either id’s by type or unique id’s per MID server impacts how the passwords are set – and maintained! Volume (the number of prod and subprod MID Servers used) usually dictates the method needed.
- If a proxy is used, After the “name” parameter, enter the correct proxy info (location in the file is not important as this is commented out in the OOTB config).
<parameter name=”mid.proxy.use_proxy” value=”true”/>
<parameter name=”mid.proxy.host” value=”[proxy].com”/>
<parameter name=”mid.proxy.port” value=”[port #]”/>
For agent\conf\wrapper-override.conf…
- Update the following two entries so that the unique id (this is the MIDSERVER_NAME entered in config.xml) is present in the service name
wrapper.name=snc_mid_[unique id]
wrapper.displayname=ServiceNow MID Server_[unique id]
Best Practice: Many admins forget this phase which forfeits the ability to recognize the MID Server in the services listing. By adding the unique id to the name, such as Servicenow MID Server_JHD_DevOps_0001, allows for a direct tieback to the runtime directory as well as the MID Server in the Servicenow MID Server list. These associations are also key in automation design.
Once the config.xml and wrapper-overrid.conf files have been completed (and the local id running the MID Server has been configured), its time to start the engine and get this MID Server running. To start the MID Server, enter CMD in the search bar on your Windows machine. When presented with the startup options, select “Run as Administrator”. Once the session starts, navigate to the newly created “D:\Servicenow\JHD-DevOps-0001\agent” directory and then enter “start.bat”. This will create your MID Server service on your machine (with the name given).
After the service has been created, we’ll need to give it some rights to operate on the machine as “Local System” does not provide the capability needed. Create an id that will have network rights in the environment where the MID Server will be used. The id should have the minimum capability model needed to run powershell on the machine, and shouldn’t have admin rights on the machine. Enter services in the search bar, and scroll to the service that was just created, stop the service, assign the “run as” to the id on the local machine that will be running the MID server, set the startup mode to “manual”, and then start the service. The service should now be able to access the instance and it will be registered there to be validated.
Log back in to to the Servicenow instance and enter MID Servers in the navigation bar. Click the MID Servers menu item to retrieve a list of the MID Servers configured for the instance where JHD-DevOps-0001 will be present in an un-validated state. Click on the MID Server entry to get the MID Server detail form and then click Validate within the options list to validate the MID Server. After a few minutes the MID Server will validate and will be ready to configure the connection and connection alias for the MID Server.
Best Practice: The reason why the MID Server service for the developer instance was set to “Manual” was so that it wouldn’t try to start the MID server on startup (initially set to “Automatic”). If it remained as automatic, it would tie up the drive preventing drive encryption from functioning correctly. On the other hand, corporate MID Servers should remain as automatic so they are immediately re-activated following a reboot.