
Initial Dev/Stage/Prod Baseline
By j.dickey | Published | No Comments
I’m going as generic as possible and loading the base versions without a lot of extras. The concept is to create a dev environment on my client, a staging environment on my server, and the prod environment on A2 Hosting. All development will take place on my client or server and will be initially sync’d manually and hopefully automated later via FPS Aloha. The next step was to build a local WordPress instance. The first one will be on my server, and I am hoping the process is not too extensive. My initial plan is to build the instance using the “Local by FlyWheel”, now known as just “Local” after changing hands several times, and then loading WordPress, the Hueman template and the Nimble Page builder. Here are some specs on the Nimble Page Builder:
There is an online knowledge base for Nimble builder here : Nimble Builder KB.
Getting started with Nimble Page Builder for WordPress
Technical requirements for Nimble Builder : server, browser, php version, WP version
Designing for mobile devices with the WordPress Nimble Builder
How to start building from a blank page with the WordPress Nimble Builder?
How to build your WordPress header and footer with Nimble Builder ?
How to set a parallax background for a section in WordPress with Nimble Builder ?
How to enable reCAPTCHA protection against spam in your forms with Nimble Builder?
How to change the page template with Nimble Builder ?
I was having a couple of caching issues, so I loaded WordPress Health Check on to FoundationalOps. It did not pick up the issue, but I noticed an A2 cache plugin, and after turning it off everything started working as expected – I’ll have to re-enable caching when I have everything functioning as expected. After the server was built and accessible, I replicated Foundational Ops on the instance on the server by hand and then use “blueprints” to load the client development instance. After all three are synced, I should have somewhat of an idea on what needs to be built for WordPress CICD in FPS and will start designing accordingly.
After completing the sync blueprint to the dev site, and loading it, I realized my local visibility is slightly different than my production visibility. As it turns out, my prod version has a couple latent aspects inherent to A2 Hosting that are not present on my local instances. I’ll try to handle that the best I can, but it will be a while until I’m at the level needed to tweak the internals in that way.
Here are my impressions after the initial dev/stage/prod build.
- It will be difficult to keep all three in sync while learning everything needed to admin WordPress internals while learning. This is the same scenario that I experienced while learning ServiceNow. The PowerShell perspective is similar to vFire and not as much as ServiceNow, so I’ll always have to keep the ServiceNow perspective in mind while developing for WordPress. This may be as challenging as ServiceNow was to implement.
- The database is mySQL, which is so much smaller than what I’m used to admining in an enterprise environment. That being said, there is a lot of valuable work that I can do on this environment to improve it and secure it. The “Local” dashboard is really nice at managing the application server needs and is quite a find! It self-updates also, so that helps.
- Syncing will likely amount to copying the DB’s down to staging and adjusting the code on a subprod. I need to create a mySQL integration to automate the sync process. Syncing prod will likely be a California teardown at some point. It’s easy enough to handle the prod sync manually, so that’s what I’ll do for a bit.
- Change control is a big player here, at least initially. I need to re-tool the admin website to focus more on change control than anything else.
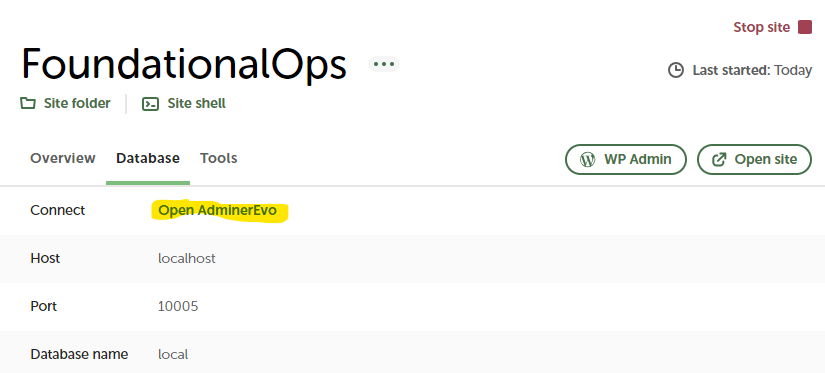
The first task was to analyze the mySQL DB and build an integration. Fortunately, Local has an AdminerEvo dashboard that can be used to access the database through a UI. This will be helpful when manual manipulations are necessary.
After reviewing the DB, I had the question “where was the DB at on the system”? It didn’t take very long to find it at C:\Users\[user]\Local Sites\foundationalops\app\sql\, but accessing it required a running agent. Since Local is my Ops dashboard, I’ll use the standard localhost agent (.NET) to provide the access. In order to utilize this, I’ll need a 64-bit MySql.Data.dll assembly to attach to – and this proved to be quite the challenge.
At first I tried to go the cData avenue for the integrations, but after loading everything I found out it required a license and violated my dictate that everything is opensource, so I had to abandon mySQLCmdLets and will have to build my own interface. Next, I needed to load a 64-bit MySql.Data.dll assembly. Everything out there seems to be 32-bit and a 64-bit assembly eluded me, but after NuGet was loaded, the assembly was loaded at “C:\Program Files\PackageManagement\NuGet\Packages\MySql.Data.9.0.0\lib\net6.0\MySql.Data.dll”. I’m not quite sure what command was entered to load this, but it eventually was the correct assembly to use for the integration on the server.
The next step was to reproduce my actions on my client to see how to document the install. This proved to be just as challenging as the first load because I wasn’t quite sure what actually loaded the assembly. The NuGet repository has the 64-bit MySql.Data.Dll, so this time through I used the following sequence of events (note: Several actions require admin access).
# To see if NuGet is there, likely just PSGallery
get-psrepository

# It won’t be there, so install it via
Install-PackageProvider -Name NuGet
# Then register it
Register-PackageSource -provider NuGet -name nugetRepository -location https://www.nuget.org/api/v2

# You should then see the NuGet repository
Get-PackageSource

At this point I installed the Connector/Net located at…
FPS\Media\mySQL\mysql-connector-net-9.0.0.msi
…and this was where I was unsure of what I did to make the MySql.Data.dll assembly appear. I tried a number of things but couldn’t get the assembly loaded. It was probably some off-shoot command that I tried to get it there, but it may remain a mystery until my next client build. To shortcut the process, I copied C:\Program Files\PackageManagement\NuGet\* to FPS\Media\mySQL and copied it in manually to C:\Program Files\PackageManagement\. This replicated whatever process I ran and loaded the correct assembly.
Once the assembly was there and accessible, I could start writing the Get-mySQLData.ps1 CmdLet. In order to establish a .NET connection, I’ll need the server (localhost), a user/pwd, the DB name, and the port to use. I did notice that the port used is not the same on the development site vs the staging site, so there must be something withing the Local config to cycle ports when creating the site. The information that I needed was all available on the Database tab within the Local console.
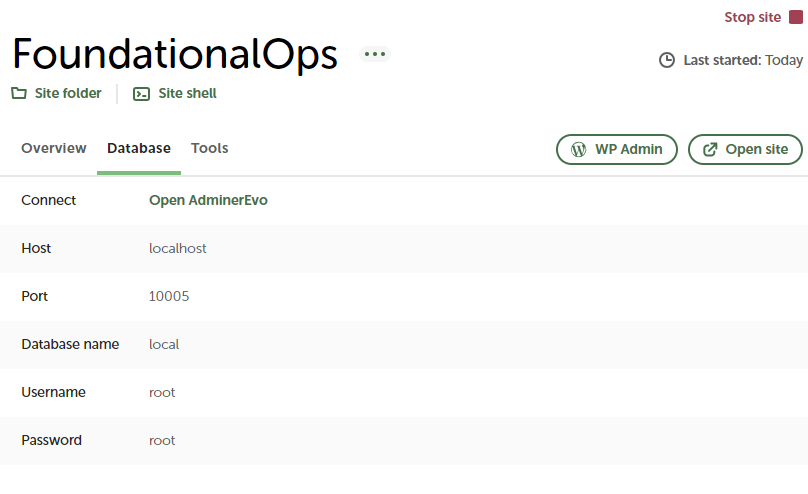
One thing that I did notice was that localhost uses root/root as the uid/pwd to the DB. C:\Users\[user]\Local Sites\foundationalops\conf\mysql\my.cnf.hbs is where this is stored, so it’s easy enough to change. The bad part is that this is clear text, so I’ll have to look into this at some point. For demonstration purposes, I’ll use the default root/root combo for access. The code I need to get working is:
$Assembly = “C:\Program Files\PackageManagement\NuGet\Packages\MySql.Data.9.0.0\lib\net6.0\MySql.Data.dll”
[void][System.Reflection.Assembly]::LoadFrom($Assembly)
$server = “localhost”
$user = “root”
$password = “root”
$dbName = “local”
$port=”10005″
$ConnectionString = “server=$server;uid=$user;pwd=$password;database=$dbName;port=$port”
$Connection = New-Object -TypeName MySql.Data.MySqlClient.MySqlConnection
$Connection.ConnectionString = $ConnectionString
$Connection.Open()
# Add table code here
$Connection.Close()
After a good bit of testing, the Open/Close worked as designed and it was on to generating the table that would need to be created out of a select (inserts/deletes/creates, etc. will be handled when we get to designing the sync process). Next up was the table select process.
The table select process followed the same vFire principles used for SQL Server by using an adapter to create a temporary table. After a bit of testing, the following code was established:
try {
$Connection.Open()
$Cmd = New-Object MySql.Data.MySqlClient.MySqlCommand($SqlQuery, $Connection)
$DataAdapter = New-Object MySql.Data.MySqlClient.MySqlDataAdapter($Cmd)
$TmpTable = New-Object System.Data.DataTable
$RecCnt = $DataAdapter.Fill($TmpTable)
if ($Connection.ServerThread) { $Connection.Close() }
}
catch { Write-Error (“Error: $_”) }
This did the trick with $RecCnt indicating the number of rows and $TmpTable containing the rows in the table for the select ($SQLQuery). $RecCnt is just extra data and $TmpTable is returned where a .length can be used to determine the number of records within. An example of its use is as follows:
if (Push-NeededFor Get-mySQLData) { . (Get-ActiveFileNm -PS1 Get-mySQLData) }
$SQLResult=Get-mySQLData -SQLQuery “SELECT * FROM wp_term_relationships”
$ptr=0
while ($ptr -lt $SQLResult.length) {
if ($SQLResult.term_taxonomy_id[$ptr] -eq 3) {
Write-Host (‘object_id = ‘+$SQLResult.object_id[$ptr]+’, term_taxonomy_id = ‘+$SQLResult.term_taxonomy_id[$ptr])
}
$ptr++
}
Referenced Source Files
Source for Get-mySQLData.ps1.


Leave a Reply
You must be logged in to post a comment.